This site is dedicated to Watkins / Wem / Wilson Guitars and Wem amps
This site is dedicated to Watkins / Wem / Wilson Guitars and Wem amps |
|
On this page I hope to be able to show how an old guitar can be restored to a reasonable condition again with particular reference to the problems and peculiarities of Watkins guitars. Dating Watkins Guitars I get many enquiries about dating the guitars. Unfortunately, there is no register or archive record from the factory which will help. I am currently conducting research to try to help owners to date their instruments. The only hope appears to be where someone has had their guitar from new and can remember the exact year they bought it. If you can help with dating please contact me (e-mail address on Contact page). Please use the information below as guidance only because the numbering system is all over the place up until about 1968. * Rapier manufacture started in 1959 with Rapier DeLuxe (I call them series 1) which looked completely different from the usual Strat shape (see guitars page) which appear to have started in 1960. Series 1 numbers go from 1 - approx 400 * Rapiers below #5000 "could" be 1960-64 especially if they have no truss rod and a glued (set) neck. A Rapier 33 bought new April 1960 is #1731 but another reader has a confirmed 1960 Rapier #5962!! 1963/64 Rapier #4443 1965 Rapier # 5650 (thanks to John Chadwick) 1966 Rapier # 7200 By 1968 serial # were in the 15,000s but it looks as if Wilson started the new company name with this new number scheme By 1972/73 a Wilson W type guitar had #18128 By 1975 a Wilson Rapier 44 had # 18252 By 1982 when production ceased, # were just over 20,000 *Some models started numbering again from zero e.g some Circuit 4 have low numbers but were manufactured in early 60s. *Sometimes the numbers seem to be completely random just to confuse everyone! *WEM logo on a guitar must be 1964 to 1968 , WILSON is 1968 onwards Body Construction Throughout most of the years of manufacture of the Rapier range, the guitar bodies were made of Jelutong wood. This had the advantages of availability and lightness but it is rather a soft wood and will easily split. Bodies were often made of two pieces of jelutong glued together and this created another potential area of weakness.Being of low density it is generally not regarded as being a good wood for "tone". Later on in the 70s Wilson addressed this failing by producing much heavier hardwood bodies.
A stripped body showing a central joint in the jelutong wood Neck Construction Sycamore was most frequently used. Early guitars had no trusses but there was a metal bar reinforcement strip inserted below the fingerboard which was usually a thick strip of mahogany. The change to trussed necks occurred in the early 60s. Early models also had set (glued) neck joints.
The reinforcement bar visible below the nut in an early neck
The neck joint in Rapier # 758 - note thickness of fretboard mahogany
The unusual domino pattern dot markers at the octave indicate a very early model
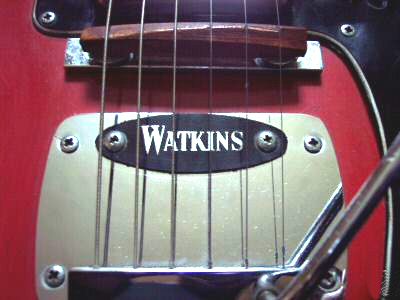
Early Rapier necks were usually solid colour but some early 60s models have a fade to natural effect in the middle of the neck. This is very unusual but is definitely an original feature. Bridge The simple bridges on early models were only held in place by the down pressure from the strings. Consequently they were often lost when guitars were left unstrung for any length of time. Many people try to find spares for this item but they are usually out of luck. I have supplied photos and dimensions to a few people who have made their own out of brass. A Tune-o-matic type can be adapted to good effect and allows adjustment of intonation. Very early Rapier guitars have occasionally been found to have wooden bridges (see below). Notice the unusal early Watkins logo which was soon superceded by the Hi-Lo logo on the trem plate.
Paintwork and Body Problems Most Watkins/Wem/Wilson guitars were finished with a polyester spraying technique which gave a very solid bright colour and deep gloss. Unfortunately in later years the finish on most guitars shows extensive cracking of the paintwork. You really have to make a decision with your guitar whether you want a guitar which looks it's age or if the finish is so bad that a respray is the only answer. Generally, vintage guitars with original finish should stay that way to preserve value.
Above - two examples of Polyester Cracks It is important to appreciate that the original Polyester finish behaves more like solid plastic than paint. If you want to remove it from the guitar, you will find that paint stripper doesn't touch it and sanding is really hard work. The best method of removal is to cover the surface with a sheet of newspaper and use a domestic clothes iron on high heat. It will then be possible to scrape off the polyester as a sheet. You may wish to hide this process from your wife if she values her iron. If you have found someone able to respray polyester, don't forget to countersink all the screw holes through the paint (even the scratchplate screws) as you replace the parts, otherwise as you tighten the screws, the polyester will develop a big split, just like cracking a sheet of plastic and you will weep like a baby (don't ask me how I know this!).
Sometimes you will acquire a guitar which has been resprayed already in a diabolical colour or has had some other 'improvements' like a different scratchplate and holes where extra pots had been added then removed. If you want to restore the guitar to anything like it's original condition, there is only one answer to a damaged scratchplate and that is a replacement. Most were 3 ply white/black/white plastic but some early ones were black/white/black. I have found that a professionally cut scratchplate is the best way to restore the condition of the guitar. Uncut sheets are available but it is quite difficult to get a good finish particularly with the chamfered edges. A new scratchplate can be provided from a template. Alan Exley provides an economical and professional scratchplate service e-mail enquiries@projectguitarparts.co.uk Also checkout Alan's website at www.projectguitarparts.co.uk where he also has replica tuners. Please mention this site when contacting or ordering parts. I have used Alan's services many times and can vouch for the quality of his work and his advice. He now has Watkins scratchplates off the shelf (right and left hand) so there is no need to supply your own template but check before ordering that your knobs have the same layout as the example shown on Alan's website. If it is different, you will have to provide a template or the old scratchplate which he will return. Don't forget that if you draw your own template, the holes for pickups and pots will not end up the right size by drawing around the inside of the holes with a pencil. Better to mark the centre of the hole with a dot and draw the holes in separately after taking the scratchguard away from the paper. The same applies to the pickup holes. Children's school geometry protractors are the best instruments to use (never mind their homework, just steal them - this is important guitar work). Alan Exley can work from the original scratchplate (even if broken) for greater accuracy. Here's some info on spraying which I sent to a correspondent: The Watkins shades of red varied enormously and sometimes they were more flamingo pink than red. Whether this was the original colour or a result of fading over the years isn't clear. The colours shown on the website are pretty representative of the range. In the early guitars the body colour extended up the back of the neck and completely over the headstock front and rear. I have been told that Volkswagen Mars Red gives a good effect but haven't tried it myself. I have used Plasti-Kote 1120 Bright Red from B&Q which is much more economical. Spraying with aerosols is a black art which I haven't completely mastered yet. You certainly need to do it in summer (unless you have a spray booth available!). The biggest problem I found (apart from kamikaze flying insects) was the wood grain showing through because the acrylic paint is so thin and even by building up multiple layers it still seems to show. I have been told by a professional luthier that the answer to this is to fill the grain with Alabastine Filler (B&Q again) or Tetrion and sanding down before spraying the first coat of primer. There is a product purpose designed as grain filler available form various luthier outlets. Try Googling Tonetech if you are in the UK. They also have Fiesta Red nitro-cellulose paint in aerosols. Caution - when using nitro cellulose paint to use nitro laquer NOT acrylic. You will find that the acrylic finish is very slow to properly harden after each layer and even after several days if you put the guitar down on anything it will stick and ruin the smooth finish so it needs to hang up and cure slowly away from dust, insects and inquisitive human beings. Anything up to a month may be needed. I have heard it said that car aerosol paint never properly hardens. Final coats of acrylic laquer give a high gloss but you need to go easy on this, it forms awful runs very easily if you go too thick on the spraying and if you put it on too thinly it will dry too fast in small droplets and look dull. The surface should look 'wet' as you spray. If you apply laquer over a pure white finish, it will slightly yellow it. Fine if you want an aged look but not if you had been wanting pure white. Another option is to find a local car sprayer with an interest in your project. I'm sure the two-pack paint they use would give a much better finish but that really is a professional job. The fumes are highly toxic and a respirator and fume extraction is required. Cellulose spraying is also best left to the experts in my opinion. PLEASE SEE READER'S RENOVATION PROJECT AT THE BOTTOM OF THE PAGE MACHINE HEADS/TUNERS On the early Rapiers, tuner quality was not very good and they looked as if they had been sourced from an acoustic guitar manufacturer. They often siezed up with rust because they were open mechanism and frequently the shafts bent. Alan Exley at www.projectguitarparts.co.uk is now marketing replacement tuners of this type.
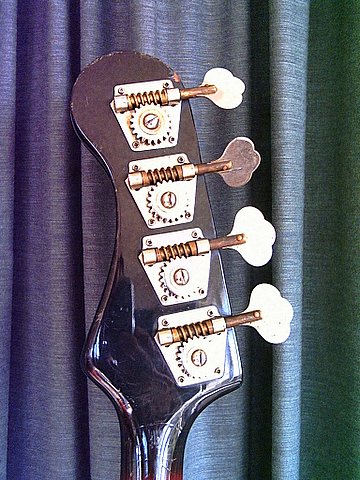
Later models had better quality closed tuners but even these do not match up to the quality which can be achieved by fitting a set of Schaller or Kluson tuners. .jpg) Of course if you are a purist, you will want to preserve the originals and they can be improved by cleaning and oiling. It is almost impossible to re-chrome the parts since they do not disassemble easily.Open Bass tuners can be stripped down. Early Bass tuners were "elephant ears" type like P-bass but by the mid 60s, they were using Egmond/Van Ghent tuners.
It is difficult to recommend a good re-chroming company since I have not yet found one who understands the components of a guitar. I have had some bad experiences with heavily scored parts, plating on one side only, parts lost in the factory and always very long delays before parts are returned. If anyone is aware of a good chrome plating company, please share it with us. PICKUPS Watkins pickups give a warm tone but they are not high output and being single coil, can be noisy.The earliest Rapier pickups were constructed with a single bar magnet and coil which was very insensitive. It is worth checking that the strings are earthed to the rest of the electronics by a wire to the bridge or tremolo plate since I have often found this to be missing.If they are low output, they can be rewound and wax impregnated and you can find rewinding services on the web.
Above - early silver mesh toaster type. Although designed for a 6 string guitar this pickup had a peculiar 5 magnet arrangement. The smaller magnet has opposite polarity and was added to boost the output of the top B & E strings. Charlie Watkins gave me the fascinating story behind these early pickups : "The pickup looks dreadful but it was what happened about 1957! Neither Reg nor I knew one pole from another so we just did the best we could and that was the result. The coil was designed in Hades and the whole thing was designed around a Hornby train set for boys. If we had had the right boffin at the time, who had known the difference between a good pickup and a b****y awful one, it would have made all the difference. I hold myself responsible for this sad situation. We found the second pole got rid of the glaring response shortfall on the 1st and 2nd strings. It wasn't until I guided Reg to the "Mighty Mite" pickup which we could buy from the US that it made all the difference to Reg's outlook and his guitar adventure. Then he went to Frankfurt one year and found that German equipment (Schaller) which made all the difference. I felt that the best contribution I made was was my knife edge vibrato which would return itself to correct tuning under almost any conditions. If it had been up to me I would have made a Fender copy for the pickups but Reg's pride wouldn't have worn that. I remember his stoicism when he decided to use polyster paint. He spent three years or so sampling and understanding that. I felt he would have mastered anything once he picked up the gauntlet. I really believe he was a genius in his own right, the patience of Job and all the guts he needed to take him along.
POTS Generally these can be restored by squirting some switch cleaner fluid (Maplin Electronics UK) or isopropyl alcohol into the small holes in the pot. If they are completely useless, Maplin.co.uk will supply replacements. DO NOT USE WD40!!! It will seem to work initially but the oil base is a solvent of the carbon track in the pot and it will very soon fail completely.
Some of the complex wiring on a Circuit 4 . Pots show access holes for switch cleaner SWITCHES These are usually well behaved but if the contacts are visible they can be cleaned by gentle abrasion with 350 or 500 grade wet and dry paper and a final squirt of switch cleaner. Always use a proper switch contact cleaning fluid NOT WD40 which is an oil based electrical insulator and will make your contacts even worse than before you started! Does anyone recognise the origin of the ubiquitous pickup switch (below) used on so many Rapiers for all those years? It was in fact originally used in Pifco hairdriers. Yet another example of Watkins adapting available components for the job and nearly 50 years later they are still highly reliable and easy to service.
TRUSS and NECK Watkins guitars are blessed with very straight necks even when the rest of the guitar has been abused. Early models had no adjustable truss rod but an aluminium bar was inserted during construction and the neck was glued to the body. There seems to be no difference in neck performance between early and later models but the usual method of truss adjustment should solve any curvature problems. ********************************************************************************************************** A READER'S RENOVATION PROJECT Paul Jenkins has sent me some very interesting pictures and details of his two Rapier renovations. Both guitars were complete wrecks when he bought them and he has done a fantastic job of renovating them. The red one is a straight renovation to original specifications but the peppermint one is quite a different beast. Paul tells the story of the renovation:
"Having been bought a Rapier 33 set neck in 1960 when still wearing short trousers, in later years (well three years ago), I decided I would like to get hold on one and take it back to its former glory and see how it compared to the Les Paul I had. Good old ebay came up with a Dulux gloss painted 33 (serial number 3144 with a set neck) which I eventually managed to sort out. Having enjoyed all the work I wanted to do another but ended up buying a set neck body (serial number 2058) needing a lot of work. I realized that I would never find the missing hardware so decided to produce something a little different. The genuine Bigsby came from the U.S. as did the active EMG pickups complete with an on board mid range boost control. I designed the pickguard and had it specially made and also managed to get some matching perloid knobs,again from the U.S. The body has been finished in nitro with the neck in clear coat. I always liked the lightweight body and slender neck but the 33 I had was a bit limited in the sound it could produce. This guitar, when plugged into a Fender all valve amp retains the great body but sounds like nothing else!! "
"Below I've also added a photograph of the modifications to the body to accept the upgraded electronics and illustrates the infill of the trem hole to accept the Bigsby. As you know, the Rapier body is very thin compared to a Strat and there is a big problem with the five way switch which is deeper than the body. I attempted to source a shallow switch but the ones I found were from China and of dubious quality. The solution was to turn the switch on its side and fabricate a new knob mechanism that now moves in an arch at right angles to the switch. If you're thinking of using strat single coils, you will need to do something similar."
"Concerning the five way switch, I've superimposed the outline onto a photograph of peppermint to illustrate how I managed to install the unit. It is a bit busy behind the scratchplate as in addition to the active EMG pickups that need a 9 volt battery installing, I also replaced the standard EMG secondary tone pot with a EMG SPC mid-range boost pot. The five way switch side is simply bonded to the scratchplate with a double sided tape with a foam inner core to give some tolerance and the switch head that would protrude through a Strat scratchplate is drilled and tapped to accept a new switchhead at right angles to the switch body that protrudes though the Rapier scratchplate and has the original plastic knob fitted. This configuration required that the body have some additional routing to make room for both the switch and the battery that is accessed from the rear of the guitar via a battery holder with an hinged access panel to keep it tidy."
"I refinished both guitars in nitrocellulose with a clear gloss top coat. The biggest problem with the early Rapier bodies is the jig holes and rather soft wood make it a long process to get a decent base to paint over. I understand the later bodies with the bolt on neck are easier to work on as they don't have the jig holes (the Wilson bodies are thicker-ed.). Cellulose is an easy finish to work with and looks like glass when cut and polished but is not so easy to get hold of as it is not used commercially any more. I purchased the red cellulose and clear from a luthier near to Manchester who re-fretted the peppermint neck and has set up a few of my other collection. Contact:http://www.manchesterguitartech.co.uk/lacquer.html The peppermint paint was specially mixed for me by a company in Wigan that supplies paint for classic motorcycles and cars. The price is about £15.00 per can and I used 2 cans of colour (2x400ml) and one can of clear lacquer. Steve Robinson, the luthier from Manchester also recommends a white base coat which adds another can but I simply used grey primer. From the location of my suppliers you will realize I'm in the North West though I went to school in Sunbury not far from Chertsey. Another option is to send your guitars to Sims Custom shop who offer a re-finishing service, though it isn't cheap. Sims machined and supplied the special pick guard I had designed for the peppermint Rapier and are specialists at other custom work. Their web site has a price guide and it seems that to strip and re-finish a set neck guitar comes to about £600 plus postage!!! Contact:http://www.simscustom.com/html/sprayshop.htm "
The red Rapier before stripping down the old paint
Both Rapiers after re-finishing. Note battery compartment for active pickups in Peppermint Rapier
The Peppermint Rapier Special
|
Strictly Copyright 20010 (c) Reg Godwin and contributors

.JPG)
.JPG)
.JPG)
.JPG)
.JPG)
.jpg)
.jpg)
.jpg)
.jpg)
.jpg)
.jpg)
.JPG)
.jpg)
.jpg)
.jpg)
.jpg)
.JPG)
.JPG)

.jpg)
.jpg)
.jpg)
.jpg)
.jpg)
.jpg)
.jpg)
.jpg)